Invite team and structure access
Copy Article URL
Use this guide to set up the people, roles, vendors, and department ownership behind your hiring process so jobs, approvals, interviews, and reporting stay tied to the right people.
Understand the roles available in Ovii
The Team workspace uses six recruiter sub-roles. Treat this section as a quick access guide and assign the narrowest role that still lets the person do their work.
- Admin (ORG_ADMIN): Primary company owner role. New recruiter registrations default here, and only Org Admin can invite users, resend invites, update users, or delete users.
- HR: Broad internal recruiting operator role. Uses the same company workspace as Org Admin and is allowed in key hiring workflows like interview panel assignment and sensitive feedback review.
- Sensitive Access (ORG_SENSITIVE): High-trust reviewer role for sensitive interview and template workflows without making the user the primary workspace administrator.
- Interviewer: Interview execution role for people who need to join interviews and submit structured evaluation, not administer the company workspace.
- Employee: Internal employee role for referral and employee-facing flows. This role routes into the employee workspace rather than recruiter administration.
- External Vendor: Agency or partner access tied to a vendor record. This role is required for vendor users and should not be replaced with an internal role.
Note
Use least-privilege role assignment. The Team page lets an Org Admin change roles later, but correcting access after live jobs and interview panels are active creates avoidable governance risk.
Note
Only Org Admin can manage user lifecycle actions in the current implementation: invite users, resend invites, update user details, and delete users.
Invite internal team members
Use the Invite Team tab when you are onboarding a small group of internal users and want to control each role assignment directly. This is the best path for recruiter leads, first recruiters, HR operators, interviewers, or any user whose access should be reviewed individually.
The form accepts multiple emails at once. Team member emails are added into the field one by one, then a single role is assigned to the batch before invitations are sent.
For non-vendor invites, Ovii currently validates the invited email domain against the inviter domain when strict domain checking is enabled. This protects internal access from drifting into personal or unrelated external inboxes.
Each invitation creates a registration token and sends an email invite link. In the current backend flow, invite links expire after seven days.
Open the Invite Team tab
Go to Company, then Team. Use the Invite Team tab when you want to add one or more internal users manually and choose the role before sending invitations.
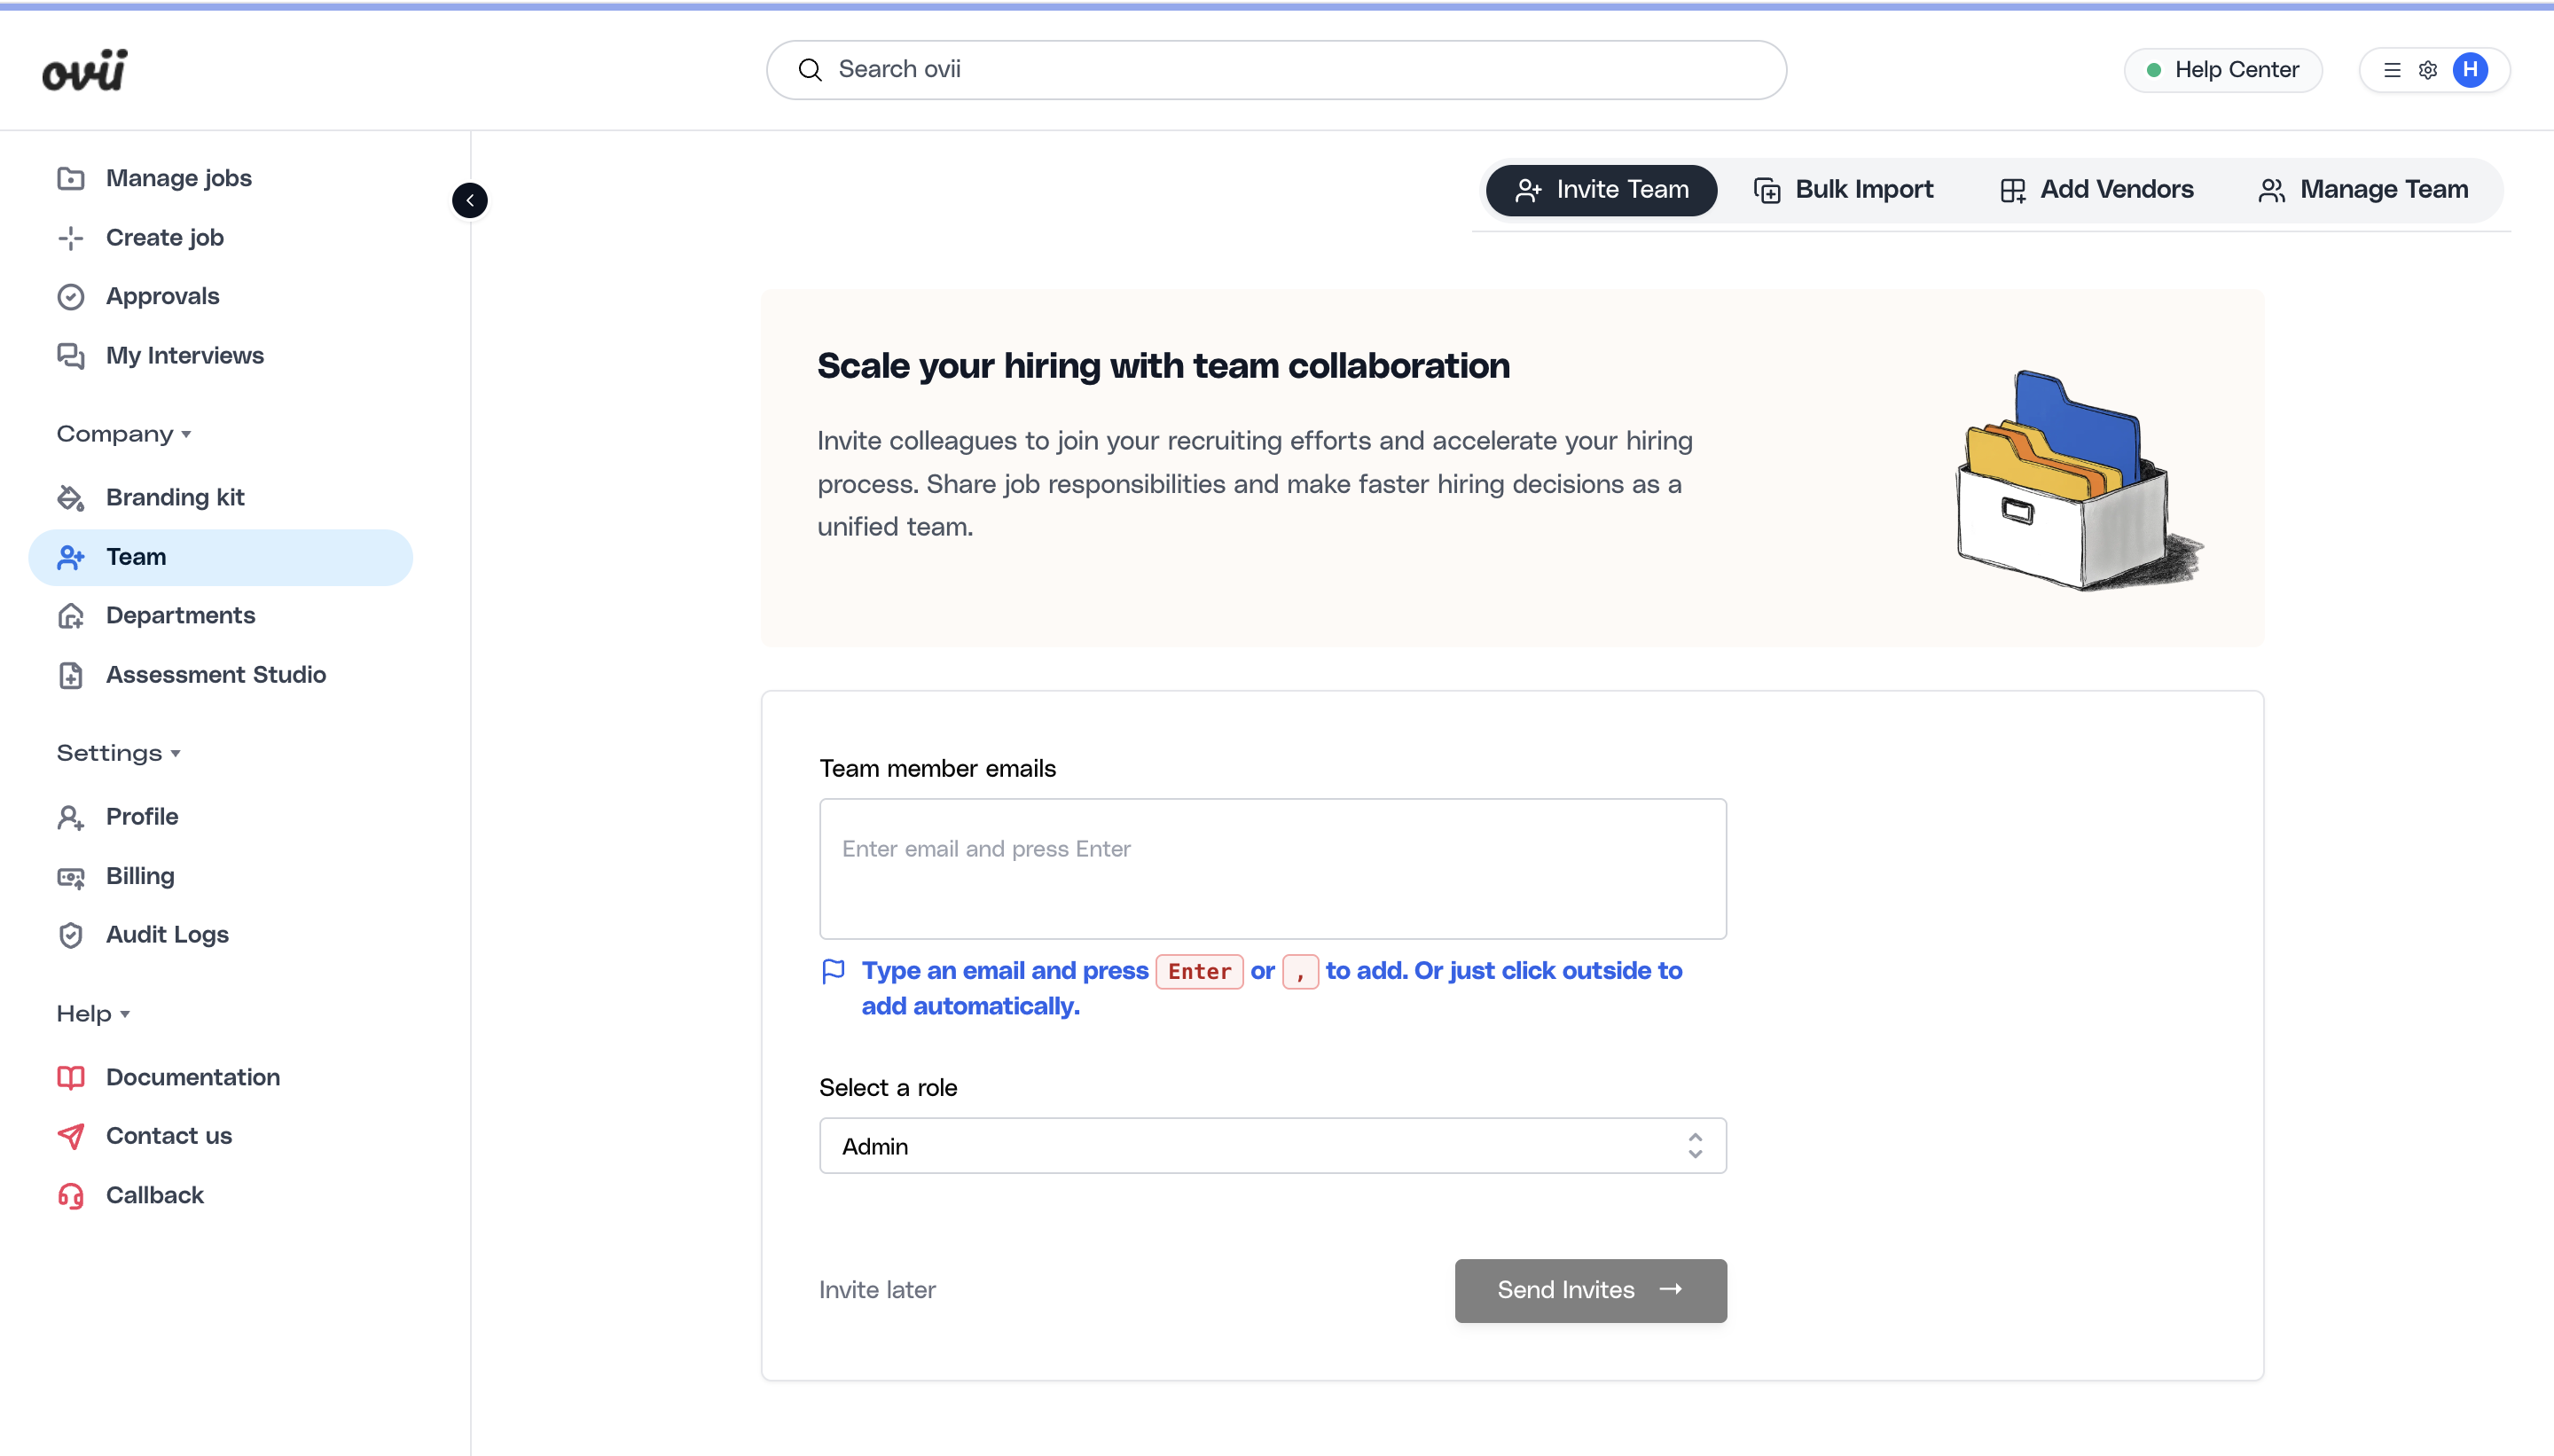
Enter team member emails
Type each email into the Team member emails field and press Enter or comma to add it. Review the entered addresses before moving on, especially if you are inviting a mixed hiring group.
Choose the right role for the batch
Select the role that matches the work those users need to perform. If the invite batch includes people with different responsibilities, send them as separate batches so the access assignment stays precise.
Send invites and monitor registration status
Click Send Invites to create the pending invitations. After that, move to Manage Team to confirm whether users are still invited, already registered, or need follow-up.
Note
Keep internal users and vendor users on separate paths. External vendor users should not be invited through a normal internal role because vendor access has additional validation and vendor linking requirements.
Bulk import team members
Use Bulk Import when you need to onboard or reorganize many users at once. This is the right option for company-wide rollout, large recruiter migrations, or role changes across multiple teams.
The bulk import flow is CSV-based. The UI lets you download the template, fill in user details, upload the file, and process the batch in one pass.
The downloaded template expects the system role codes exactly as implemented: ORG_ADMIN, ORG_SENSITIVE, INTERVIEWER, EMPLOYEE, EXTERNAL_VENDOR, and HR. If the CSV uses unsupported role names, the upload is rejected during validation.
For vendor rows, the CSV requires a vendor name that already exists in the vendor directory. The importer maps that vendor name to a vendor record before creating EXTERNAL_VENDOR invitations.
Download the CSV template
Start in Bulk Import and download the template so the column order and supported role values match what the importer expects.
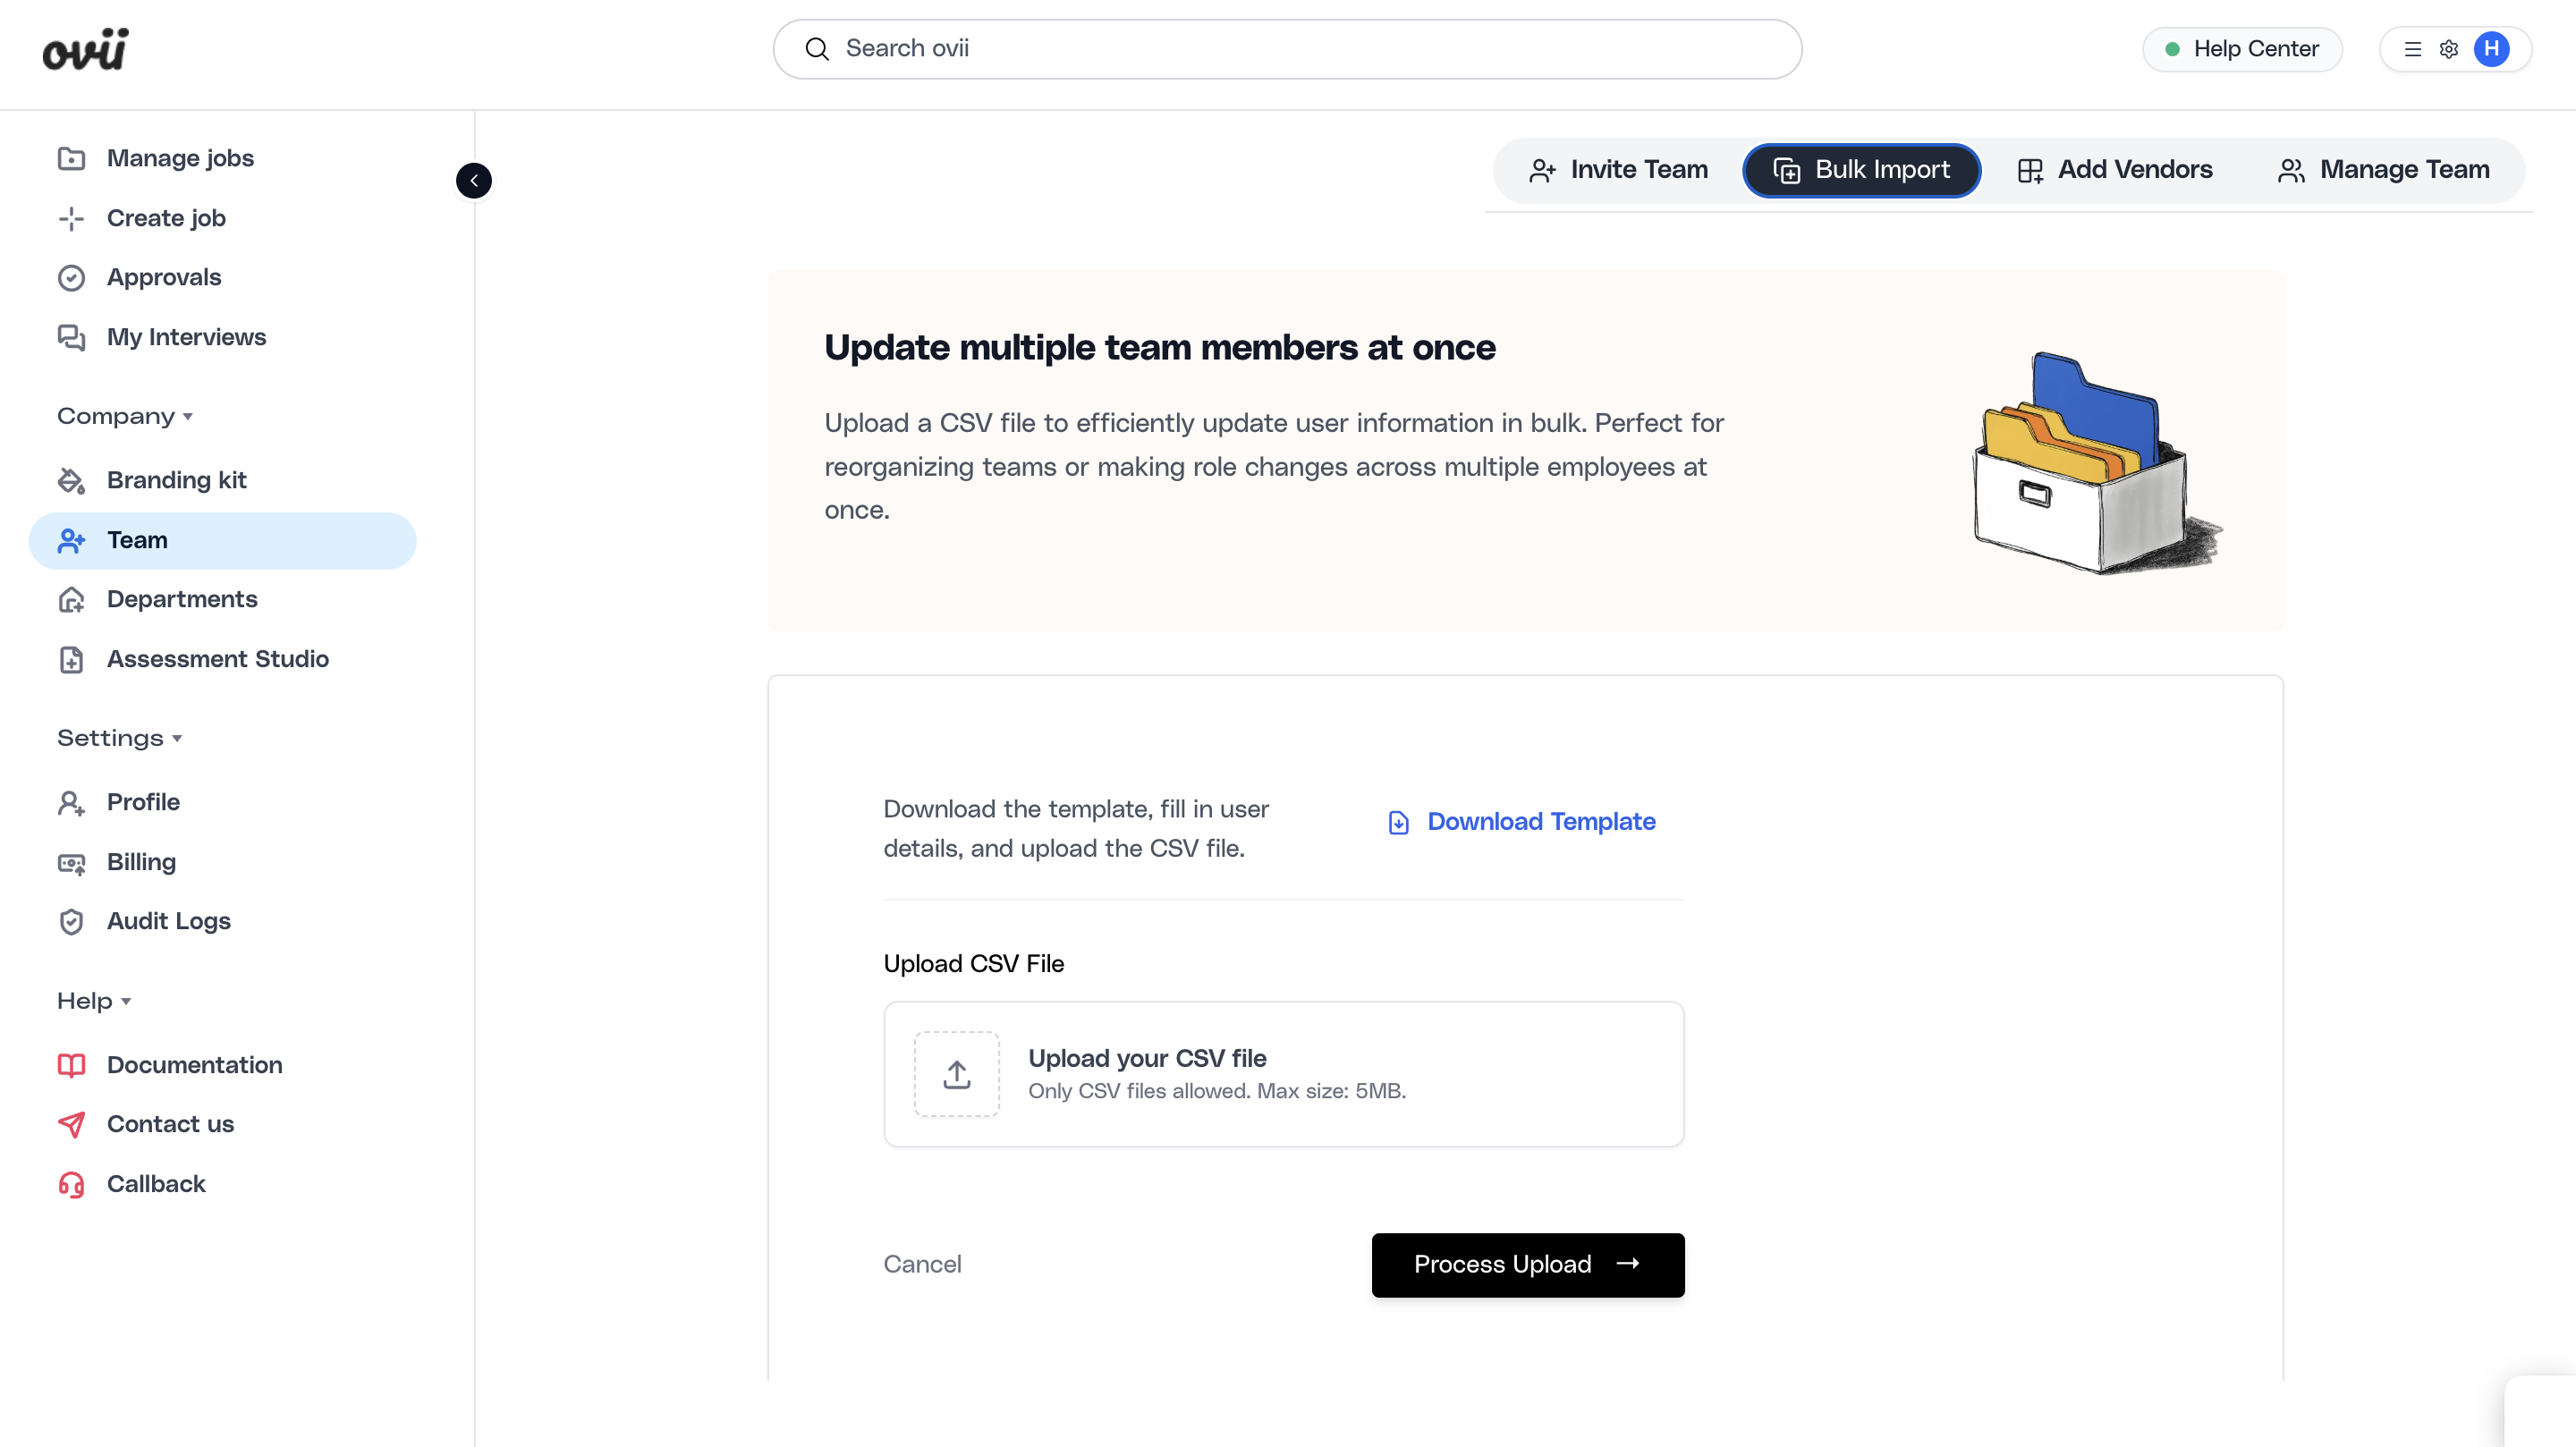
Complete the file with user data
Fill in email, fullName, and role for each user. Add vendorName only for EXTERNAL_VENDOR rows. Keep the role values in system format rather than changing them to custom labels.
Upload and process the file
Upload the CSV and run Process Upload. Ovii validates required fields, email format, supported roles, and vendor mapping before creating invitations.
Review successes and failures
If some rows fail, Ovii returns line-level validation or invite errors. Correct the file and retry only the failed users so the batch stays auditable.
Note
Bulk import is best for controlled administration, not for bypassing role review. Clean the source file before upload so people are not accidentally assigned the wrong access tier.
Add vendors before inviting vendor users
Use Add Vendors to create the vendor record first. This vendor directory entry becomes the anchor for later vendor-user invitations and for vendor-specific job participation.
The current vendor form captures Vendor Name, Primary Contact Name, and Primary Contact Email. Creating the vendor does not yet invite a user by itself. It only prepares the vendor record so EXTERNAL_VENDOR users can be linked correctly later.
This separation is important operationally. It lets your team approve and name the vendor entity first, then decide which external people should receive actual access.
Open Add Vendors
Go to Company, then Team, and switch to Add Vendors when you want to register a recruiting partner or agency in Ovii.
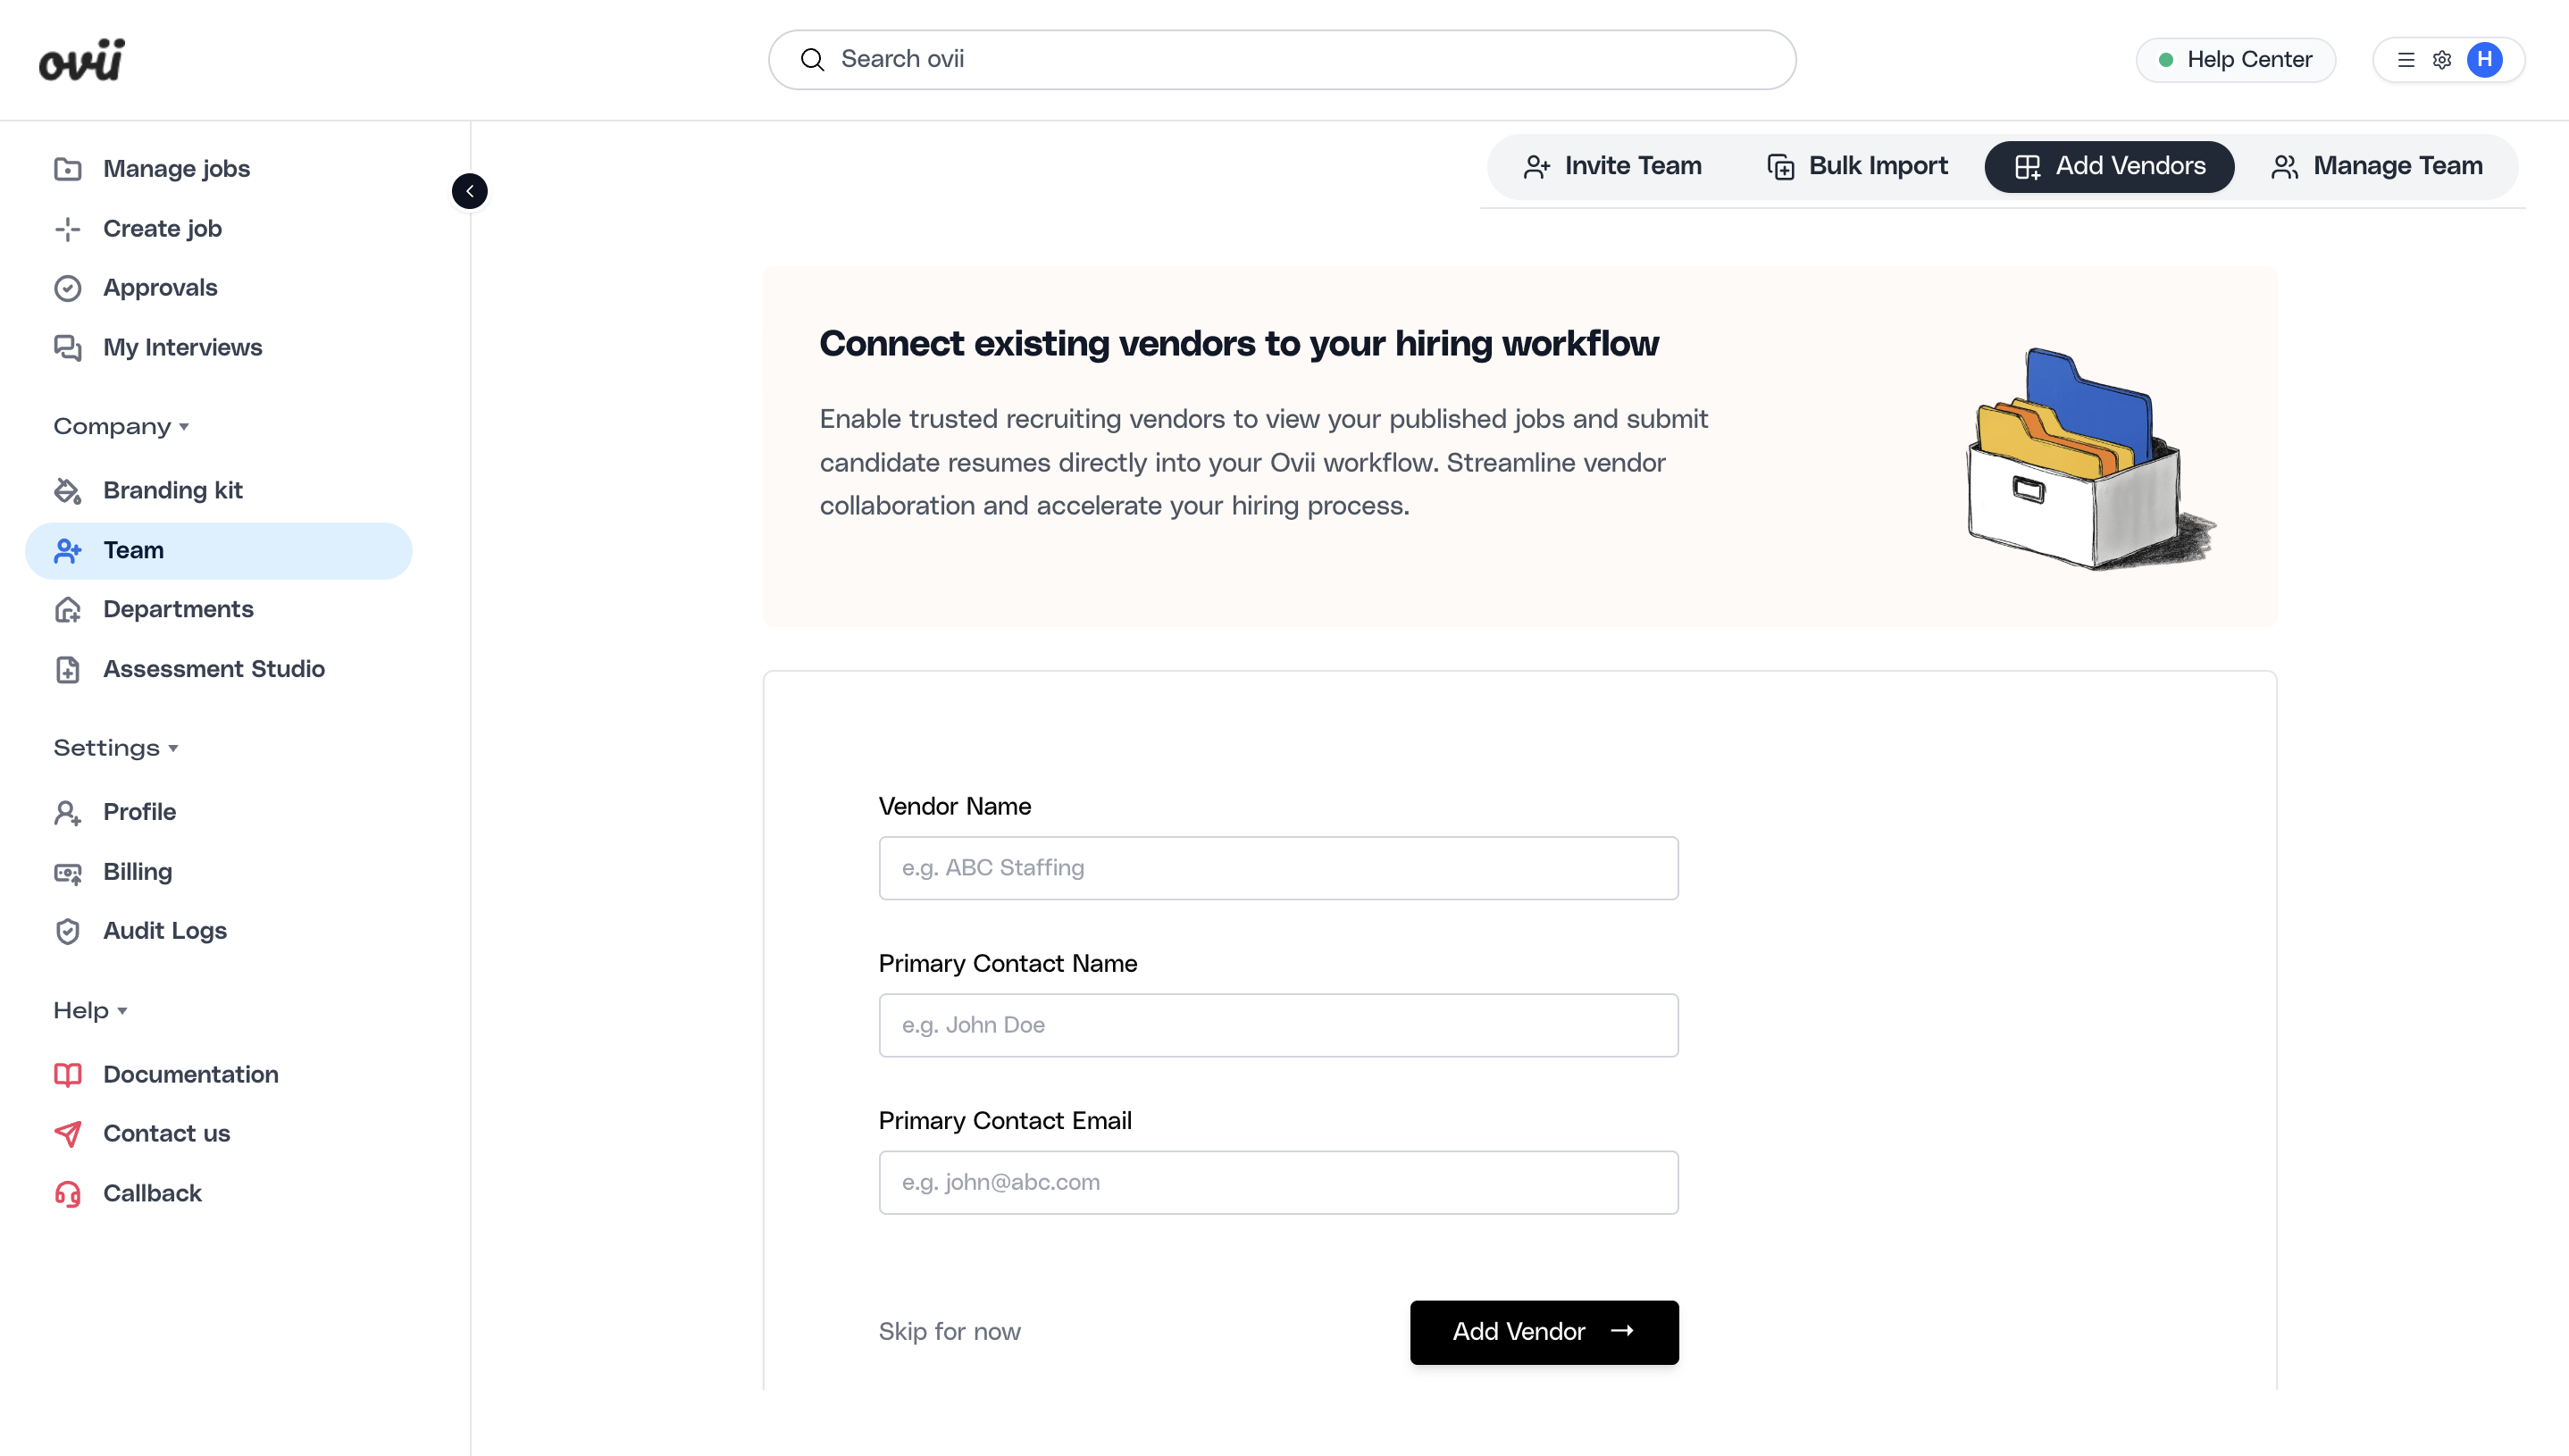
Create the vendor record
Enter the vendor name, the primary contact name, and the primary contact email. Submit the form to create the vendor entry in your company vendor directory.
Return to team invitations after the vendor is created
After a vendor is created successfully, the workflow returns you to the invite flow so the external users can be invited against that vendor.
Note
A vendor record is required before inviting any External Vendor user. If no vendors exist, the Invite Team form blocks vendor-role invitations and directs the admin to Add Vendors first.
Invite external vendor users
Once the vendor record exists, go back to Invite Team and choose the External Vendor role. The form then requires you to select which vendor the invited users belong to.
Vendor-linked invitations are different from internal invitations. In the backend, EXTERNAL_VENDOR invites require a vendorId, and the strict internal email-domain check is intentionally skipped for this role so trusted external partners can register with their own business email domains.
When an invited vendor user completes registration, the backend links that user to the vendor record so vendor-specific job access and candidate submission workflows can work correctly.
Choose External Vendor as the role
In Invite Team, add the vendor user email addresses, then switch the role selector to External Vendor so Ovii loads the vendor-specific requirement.
Select the correct vendor
Choose the vendor record that should own those invited users. This association is what ties vendor users to the right partner account inside Ovii.
Send the invite and track registration
Send the invitations, then use Manage Team to verify whether the vendor users remain invited or have completed registration.
Note
Do not use internal roles for agency or partner users. External Vendor is the supported path because it preserves vendor linkage and downstream vendor access behavior.
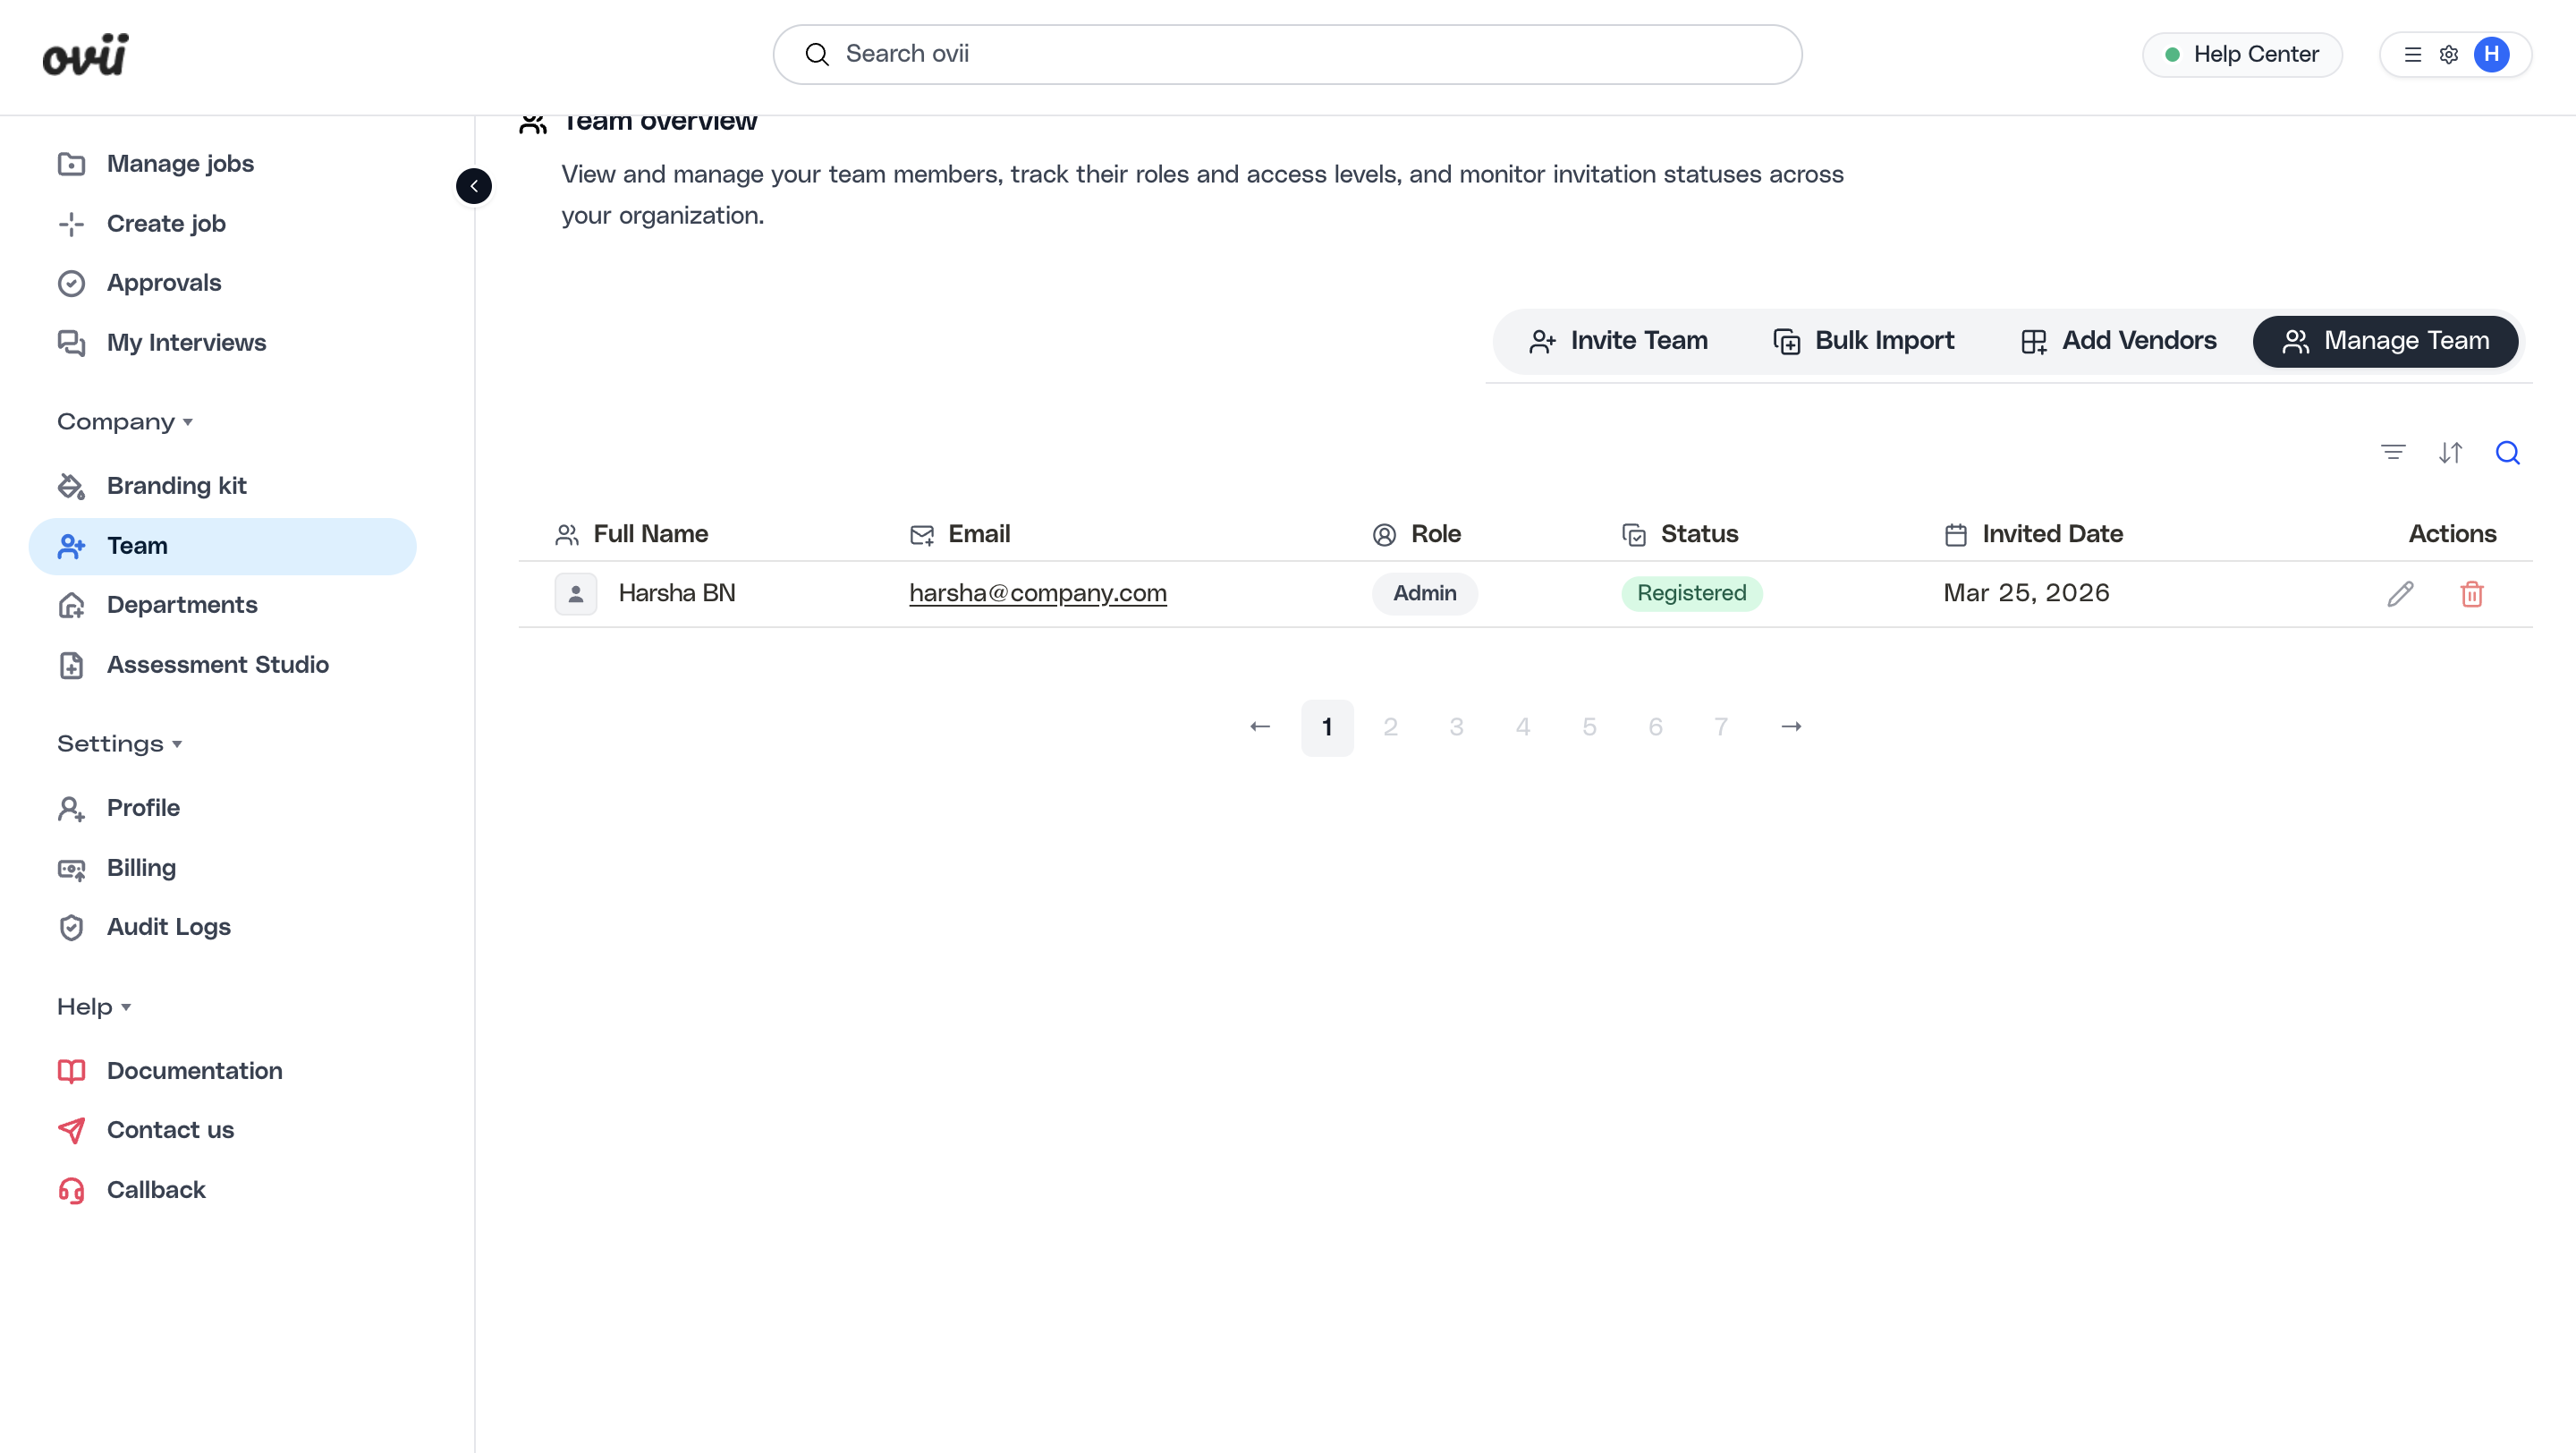
Manage existing team records
Use Manage Team as the control point for existing users and pending invitations. The table shows full name, email, role, status, invited date, and available actions in one place.
Status values distinguish where each user is in the lifecycle. Registered means the person has completed onboarding, Invited means the invitation exists but registration is still pending, and Failed indicates the invite attempt did not complete successfully.
From this table, Org Admins can edit users, resend invitations, or delete users. The backend also protects the last active ORG_ADMIN from being deleted or downgraded to another role, which prevents the workspace from losing its last company administrator.
Review the current team roster
Open Manage Team to inspect user records after each onboarding round. This is where you confirm the assigned role, current status, and lifecycle actions available for each person.
Note
Use Manage Team as the source of truth after every onboarding wave. It is the fastest place to confirm who is already active versus who still needs follow-up.
Note
Only Org Admin can perform update, resend, and delete actions in the current implementation.
Structure access with departments
After the right people are in the system, use Departments to separate ownership across business units, functions, or hiring teams. This matters once jobs, approvals, and reporting need to reflect who owns what inside the company.
The department setup flow supports named departments, parent-child structure, and a department head email. In the current validation flow, the department head must belong to your company and be a registered user.
A clear department model reduces confusion around who owns requisitions, who should approve changes, and who should be accountable for candidate progression in each part of the organization.
Governance best practices
Start with a small number of Org Admins, keep HR and Sensitive Access assignments intentional, and use Interviewer or Employee for narrower participation models whenever that is enough.
Separate internal users from vendors operationally. Internal access should stay tied to company ownership and departments, while vendor access should stay tied to vendor records and assigned vendor workflows.
Review the Team page regularly as hiring volume grows. Clean up stale invites, remove users who no longer need access, and revisit department ownership whenever hiring responsibility changes.
Note
Treat Team, Vendors, and Departments as one operating model. The best results come when roles, vendor boundaries, and ownership structure are kept aligned from the start.